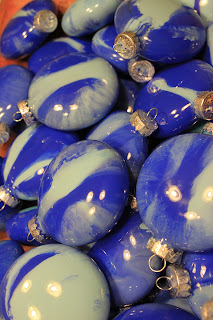
Every year I make a bunch of ornaments to hand out at my annual ornament exchange party. I've been pinning ideas for the past year and chose to do this one from this blog. Hers turned out so much better, as is the case with most things I do. Even so, I'm really happy how these turned out!
I was going to go with small bulbs...because I figured it would be faster (making 50 of them) and cheaper. But, I found this cool shape at Michaels, sort of a flat circle. I bought 52 of them.
I started by protecting the surface of our kitchen table. That's my sister in the corner there...she came over to keep me company and cheer me on.
The blog where I stole got the idea from used a bunch of different colors. I'm of the keep it simple mentality when for a light and dark blue.
Here's a better idea of the shape of the Christmas bulbs.
In the original blog she mentioned using acrylic paints and shaking the bulb around. I'm not sure if it's the brand of paint I used, or the style of bulb....but it didn't work too well. I added some water and it helped quite a bit, especially with mixing the two blues and then giving me a third blue in the finished product.
Added a little water.
Added some paint
Added some of the darker paint
and shook it around
from side to side
and up and down
One thing I learned while doing this is to wad up some paper towels and shake the ornament with that on top to catch excess watery paint...otherwise you could have paint flying all over the place -- oops.
I was kind of afraid it looked too 'stripey' the way I was doing it. So I thought of adding some oil to the mixture. Doing so gave it a more marbleized effect. Which I liked
The one on the lower right corner is the one with oil. The problem is the next day, some of those had the paint separate a little bit and of the 5 I broke they were the ones with the oil...not sure if it's just they were slippier or if there was some weird chemical reaction.
Bought 52 of them and after breakage I have 47 to give away.
After letting everything dry, I took some windex and cleaned them up.
I'd like to say I was doing these with Christmas carols and laughter playing in the back ground and everyone in the family celebrating good cheer. But I had Walking Dead on and the kids and I were discussing the best way to defeat Zombies and how to survive a Zombie apocalypse.
A quick look in the middle of the finished product pictures to show how messy my hands got. Really it's just me, it's not that messy of a project....I walk by paint and get it on myself.
I'd say the project took about 5 hours from start to finish and cost about $45.


7 comments:
Those look great! Wonder if I can get bulbs like that around here! Will have to look!
Very pretty. Love the color combo ... Looks like planet Earth from space. Maybe that was a secret zombie escape ;)
Thank you for partying with the Wildly Original Crowd.
<3 Christina at I Gotta Create!
Those are beautiful! I'd love to have you join my Pin Me Linky Party because this is an awesome idea! I'm going to pin it now!
Wow, you did a great job. And I love how more meaningful they are!
Sandra
That's a fun project with kids,too because they can ALL do it. Though I must say, less is more when it comes to paint... The paint has to dry and if it is puddling at the bottom, then it won't dry. Maybe drying them upside down? Hmmmm...
Wow, these are beautiful! Would love it if you linked up on my blog hop www.w-t-fab.com/search/label/bloghop. Also let me know if you'd like to follow each other!
These turned out great! What a great idea for neighbor gifts.
Post a Comment